
Setup Pinterest Rich Pins With WordPress
Undoubtedly you’ve heard of Pinterest. They soared to over 100 Million registered users in 2015. Pinterest is no longer just for collecting photos of food and wedding decor. Big business has made the jump to the social media platform. These businesses are harnessing the power of Rich Pins. By allowing pins to contain additional information, Rich Pins give businesses an edge over their competitors and help them to increase their online presence. But since Rich Pins are free, why aren’t more people using them?
In this post I will show you how to enable Pinterest Rich Pins within your WordPress website.
So What Exactly Are Rich Pins & Why You Should Use Them?
With Pinterest Rich pins enabled, each time someone pins an image from your website or shares a pin on Pinterest, Pinterest gives you the option of including additional information. This gives Pinterest users a better understanding of your content with the aim of improving engagement.
Enabling Rich Pins with the Yoast SEO WordPress Plugin is a Cinch

I’d bet there is a good chance that while you may have heard of Rich Pins before, there’s a pretty good chance that if you are reading this, you’ve yet to enable them for your WordPress website. You may have looked into it in the past and thought it was a difficult process. Let me assure you it is not!
To get started with enabling Rich Pins, you need to add the Open Graph code to each page of your website. With Yoast SEO much of the heavy lifting is taken care of for you.
With over 1 million active Yoast SEO users, there’s a good chance you’re already using this essential WordPress plugin on your website. Amongst the many things the Yoast SEO plugin can do, it provides an easy way to enable Rich Pins for posts on your site – something that most businesses with a blog will benefit from.
Let’s Get Started and Set up Rich Pins for WordPress
Once you have installed the Yoast SEO plugin, go to your WordPress dashboard.
- Choose SEO > Social.
- Click on the Facebook tab.
- Check ‘add Open Graph meta data’.

The next step (if you haven’t already done this) is to confirm your site with Pinterest. To use Rich Pins, you do need a Pinterest business account. If you are currently using a personal account, you can easily convert it to a business account before you proceed any further.
To confirm your website with Pinterest:
- Log into Pinterest
- Choose Edit Profile > Website
- Type in your website name and click ‘Confirm Site’
- Copy the code that appears in the box
- Switch back to your website
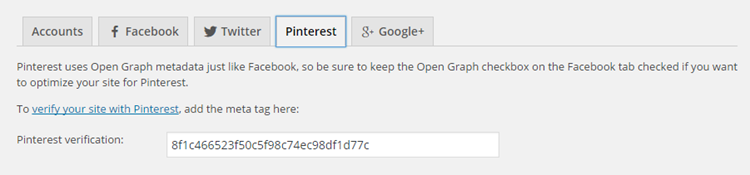
- Choose SEO > Social
- Click on the Pinterest tab
- Paste in the code from Pinterest into the box and save the changes
- Return to Pinterest and click ‘Finish’
Last but not least, the final step is to validate your website for Rich Pins:
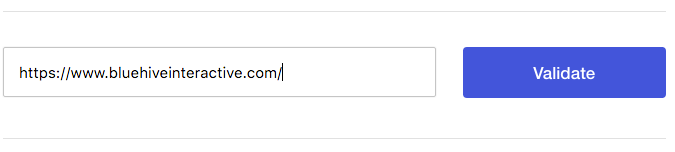
- Click here to open the Rich Pins Validator page
- Choose any page of your site, copy the URL and paste it into the box
- Click ‘Validate’
Next, Pinterest will send you a confirmation email to confirm that Rich Pins is set up for you. This can take up to a couple of days, but often the email arrives instantly.
Quick Tips to Check Before You Begin Pinning
Before you begin pinning, check your images. They need to be original and engaging. Something your target audience will be interested in and want to re-pin.
More importantly, make sure your meta data is filled in as this is the information that will be displayed as part of your Rich Pins. Add a thoughtful description or a call to action in the SEO field for each post to encourage Pinterest users to visit your website to learn more about your business and content.
It’s important not only that the information displayed is correctly, but also that that your pins look good. So pin your images to Pinterest to see how they will look. Examine each pin through your audience’s eyes. Would you click to find out more if you saw a pin like this?
Publishing Other Types of Content?
There are actually 6 different types of Pinterest Rich Pins. Apart from Article pins, they also offer Movie Pins, Place Pins, Recipe Pins, App Pins, and Product Pins. To find out more, click here.
The type of website you run will determine which type of Rich Pin will be the best choice, although the majority of sites will use Article Pins for their blog posts.
But What About Pinterest Rich Pins For My E-Commerce Website?
We’re glad you asked. If you are running an e-commerce website, then you’ll want to use Product Pins instead of Article Pins. A quick and easy way to activate them on your site is to use the free WordPress plugin, WPSEO Pinterest Rich Pins for WooCommerce. Used alongside Yoast SEO, this plugin enables you to add Pinterest Rich Pin data to your WooCommerce product pages.
Final Thoughts on Rich Pins for WordPress
If you follow the steps, you should be able to have Rich Pins set up on your site within the hour. Check your metadata to see how your pins will look, then you will be all set.
Each time you or a visitor shares your content on Pinterest, you’ll get all the benefits of Rich Pins. If you haven’t done so already, don’t forget to add a social sharing WordPress plugin to your site to encourage pins.
Happy ‘Rich’ Pinning!